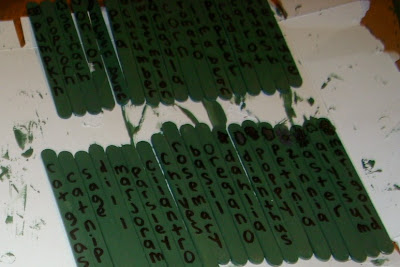
Taa-Dah. I think next time I will use paint for my pictures instead of colorful permanent markers. Some of the colors didn't turn out very well on my dark green back ground paint. I also didn't realize how hard these tiny images would be to draw on the tip of a popsicle stick. I suppose if I wanted them to be more cutesy I should have used the larger size. Oh well.
I have used popsicle sticks successfully as markers before, but they get damp and break once they've been sitting in the soil for a while. I was looking for a way to be able to reuse them. I happened to have some extra exterior paint laying around and decided that painting them would protect them from the moisture. Not only that, but it would also add a nice splash of color too.
Would you like to know how we made them? Well, I suppose it's rather obvious, but I'll tell you anyway!

First we painted the popsicle sticks with my exterior paint one side at a time making sure not to forget the edges. I used a cardboard box to protect the table surface. I was also hoping that the paint wouldn't stick to the boxes like it does to newspaper. While it worked a bit easier, I'm not sure that it was entirely successful. Upon closer examination I see bits of cardboard embedded in the paint that I wasn't able to get peeled off completely. I think next time I will place the painted sticks on two unpainted sticks to dry and I'll see if that works any better.
If you use thin coats of paint, it doesn't take long for them to dry. Popsicle sticks can be a bit porous, so if you want an even coat you may want to apply two coats of paint to each side.
Once both sides were painted and dried was time to decorate and label them.

I went through my seed packet collection to see what types of labels I would need when it's time to start my seeds. I started with my vegetables and worked through to the flowers and herbs. I didn't realize I had that many seeds! I decided to use rather generic labels since I plan on reusing them again. If you wanted to you could write out the types of radish or tomato plants you have so they don't get mixed up. I'm not going to be so fancy right now. I've got plenty of extras so I can always go back and add more next year if need be.
To make it look cute, I drew pictures of the vegetables as well as writing out the words on the label. As you can see I didn't do the pictures very successfully so I gave up on the pictures by the time I reached the herbs. I made the outlines of the pictures with black permanent marker (fine line would have worked better) and colored it in with different colors attempting to correspond to the real colors of the vegetables. As I said earlier I think if I did this again I'll use paint and then an exterior varnish over it to prevent chipping. I couldn't skip the words since I'm not the greatest artist but if you have nice clear pictures I'm sure that the printed words wouldn't be necessary.
Thank you for stopping by to chat with me. Please leave me a message, I'd love to hear your thoughts!
Cindy

12 comments:
Hi Cinj, I am interested in how well the paint coating saves them. Let us know how they hold up out there in the garden. One year I used wooden paint stir paddles without painting them, and they rotted off too soon. I think you are smart to do that project.
They turned out really nice. What a fun project to get you in the mood to plant.
Looks like it was a fun project. I want to know how the paint stands up also. Mine in my germination tray weren't painted and all they did was turn black and get moldy on the bottoms where they were in the soil. Also was a place for little bugs to stay so I had to pitch them out and use plastic strips cut from old margarine bowls. Your paint and a layer of varnish may be what I needed on my wooden markers.
Good reuse. I love the green color.
Good idea with the popsicle sticks. I have to use something to mark my vegatable plants next week or two. Thanks for sharing.
I like them and you had time with the kids to talk about all kinds of wonderful topics...A good project for everyone~~gail
Great project Cinj. You are so good at starting and completing projects. I'll be interested in seeing how they hold up over time too. I work with decoupage a lot and one brand in particular is waterproof ~ I'm thinking you could put that over the paint too? Judging by the number of sticks, it looks like you're going to have a bumper seed crop!!
Great idea Cinj, let us know how well they hold up in the garden. :)
What a great idea. Much nicer than those white plastic markers.
Looks like a fun project, they're pretty, and useful...and for a really GREAT cause: Gardening!! I love your header! Happy First Day of Spring;-)
I'll keep you all informed. I sure hope that the paint helps. I will be getting some veggies started soon.
How cleaver an idea!
Post a Comment